Step Through Drill
Golf Fitness & Training
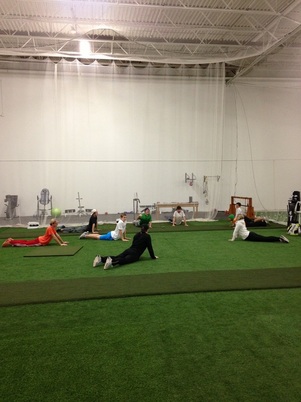
Saturday morning workouts with Ernie Rose Golf
The following are simple exercises that can translate into immediate improvement in overall fitness and your golf swing.
Exercises to become a "Body-Swinger"
Hip Twister/ Torso Twister
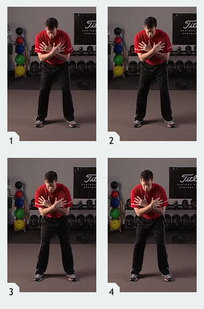
This is a great exercise to help you learn to initiate the downswing with the lower body and create separation between the upper body and lower body.
Step-by-Step Instructions
Get into a good golf posture and try to rotate your lower body only (no shoulder movement). Make sure the movement is rotational and not lateral sway and slide.
Perform the same movement, but this time keep the lower body still and rotate the upper body. Make sure the movement is rotational and the head remains still (i.e. does not turn with the torso).
|
|
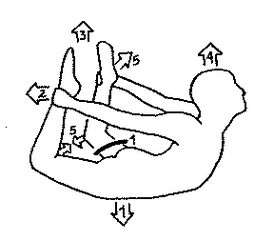
Start with the club in front of the impact zone. As you bring the club back step forward with your lead foot and clear your hips, noticing the feeling of your hands lagging behind. This exercise will help you develop the feeling of
clearing your hips before impact. |
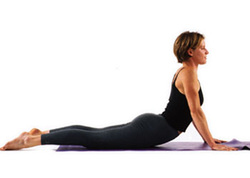
Overhead Deep Squat
|
|
The overhead deep squat is a great exercise to increase stability and flexibility in the golf swing. Using a golf club, place hands overhead and perform a squat. Continue past parallel, if you're able, and slowly work your way back up to the standing position. Work to get lower each time to see improvements in your game.
|
Core Matrix Routine
Along with the abdominals, the muscles in your lower back are known as your core. Together they work to keep you limber and able to twist and
bend with ease. Strong lower back muscles also serve to protect the natural inward curve of your lumbar spine. If this curve gets flattened through injury or overstretching, the ligaments surrounding your lumbar disks and the gel that separates them may tear and leak respectively and cause lower back pain or a herniated disk. Keep your lumbar disks safe by practicing exercises that strengthen your lower back and abdominals.
bend with ease. Strong lower back muscles also serve to protect the natural inward curve of your lumbar spine. If this curve gets flattened through injury or overstretching, the ligaments surrounding your lumbar disks and the gel that separates them may tear and leak respectively and cause lower back pain or a herniated disk. Keep your lumbar disks safe by practicing exercises that strengthen your lower back and abdominals.
Bow Pose
Yoga poses are very targeted and in this case, the Bow pose zeros in on your lower back. The extreme arch created in the pose complements the curve of your lumbar spine and strengthens your back without subjecting your disks to pressure.
Lie on your stomach on the floor. Lift your head and shoulders off the floor and bend your knees so that your lower legs come off the floor. Reach behind with your left hand and grab your left ankle. Do the same on the right. On an inhale, try pulling your ankles away from your hands. This will have the effect of lifting your upper thighs slightly off the floor. Breathe normally for up to one minute and release.
Lie on your stomach on the floor. Lift your head and shoulders off the floor and bend your knees so that your lower legs come off the floor. Reach behind with your left hand and grab your left ankle. Do the same on the right. On an inhale, try pulling your ankles away from your hands. This will have the effect of lifting your upper thighs slightly off the floor. Breathe normally for up to one minute and release.
Cobra Pose
The transversus abdominus muscle is the deepest muscle in your abdominal suite of muscles and rides around your lower torso to help support your back. In the Cobra, you're strengthening the transversus as well as your erector spinae muscles, which lie in your upper lower back.
Lie facebodwn on a mat or rug. Place your hands next to your chest and glue your arms to your sides. Inhale and raise your head very slowly, followed by your shoulders and upper chest. Use your back muscles to pull upi up rather than your hands to push upu up. Tighten your hamstring muscles to alleviate pressure on your lower back. Breathe normally for up to one minute and then relax back to the floor.
Lie facebodwn on a mat or rug. Place your hands next to your chest and glue your arms to your sides. Inhale and raise your head very slowly, followed by your shoulders and upper chest. Use your back muscles to pull upi up rather than your hands to push upu up. Tighten your hamstring muscles to alleviate pressure on your lower back. Breathe normally for up to one minute and then relax back to the floor.
Dynamic Back Strengthener
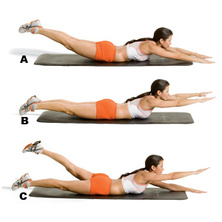
This total back exercise can be held for as long as you want or converted into a
dynamic back strengthener.
Lie facedown on a mat or rug for the Supermans (B). On an exhale, lengthen your legs behind you until they raise a couple of inches off the floor. Raise your arms and keep your neck in line with your spine. When you're ready, release the pose.
For the next phase called the Swimming exercise (C), exhale and then raise your right arm and left leg simultaneously. Inhale and release. Exhale and repeat with the opposite arm and leg. Continue for up to 15 times on each side
Standing Spine Flexes
This exercise can be done seated on the floor or standing. Engineered to keep your
spine flexible and the disks lubricated. Standing spine flexes can be performed
any time you fell compression in your back from sitting or slouching.
Stand with your feet hip width apart. Bend your knees slightly and place your hands on your
legs just above your knees. Start with a flat back and then on an inhale curve
your back down. Exhale and arch your back. Continue in this manner for up to two
minutes.
Bridge
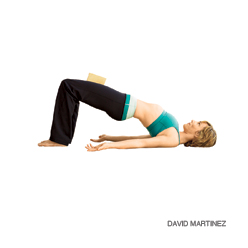
Lie on a flat surface such as carpeted floor or fitness mat. Bend your knees and place your feet flat on the floor with your feet six to eight inches apart. Your palms should be flat on the floor alongside your body. Relax your upper body and back while you draw in your abdominals and squeeze your pelvic floor muscles (as if you were stopping the flow of urine). Exhale as you press your hands and forearms into the floor and slowly push your pelvis up towards the ceiling. Hold in an up position for a slow count of three. Inhale as you slowly lower your body back to the start position. Keep your abdominals tight to avoid sagging in the low back or glutes. Perform tow to three sets of 12-15 repetitions, allowing 30-60 seconds rest between sets.
Intermediate Bridging
You can increase the challenge of the bridging exercise by extending your "up" position to 30-60 seconds to challenge the gluteal muscles. You can also try placing your feet flat on a table or chair with your knees bent in the starting position before elevating your hips into the bridge. Place your feet on a Swiss Ball to create an even more demanding version of the bridging exercise.
Advanced Bridging
The one-legged bridge is extremely challenging as it requires one-leg strength and stability through the back and hips. Start in the basic bridging
position with one leg extended straight out on the floor. Tighten the abdominals and raise your buttocks off the floor with one leg, bringing the extended leg up so that your thighs are parallel to the ground.
Dynamic Golf Stretches (Pre-round Warm-up)
Dynamic stretching is useful before competition and has been shown to reduce muscle tightness. More recent scientific studies seem to suggest that dynamic stretches before competition are preferable to static stretches. All exercises below should have 5 second holds and be done 5-10 times.
Standing Cat & Camel/Pelvic Rotation
Begin in your address position, arms across chest. Tuck the pelvis under then arch the back, creating a rocking of the pelvis into anterior and posterior positions and return to a neutral spine.
Trunk Rotation/Vertical and Horizontal Axis
Standing in your address position, bring the palms together. Inhale as you rotate from the core and bring both arms back. Mimic the backswing then follow through with a stop at the address position. Try the same exercise at chest to shoulder height twisting the trunk and keeping the arms in parallel to the ground.
Standing Hip Stretch
Use a golf club for assistance with balance. Place one ankle on the outside of the opposite knee. Inhale as you bend your stance knee, sitting back as if you are sitting on a chair. Bring the chest toward the shin, rolling the shoulder blades together. Reverse legs.
Shoulder Rotation Stretch
Place a club or towel in your right hand, palm facing the ceiling, bring the right arm over your head and the right palm behind your back. Bring your left arm behind your back and clasp the club or towel. Move the club up and down your back stopping when you feel a stretch and squeeze the club together. Switch to the other side.
Upper Trapezius Stretch
Bring the right ear toward the right shoulder. Inhale as you press your left arm toward the floor, exhale and relax the left arm. Switch to the left side.
Standing Shoulder Blade Stretch
Bring the club to shoulder height, bend your knees and tuck your pelvis under. Inhale as you press your arms away from you, tucking your chin into your chest. Exhale, lift the head and squeeze the shoulder blades together.
Wrist Flexion/Extension
Stand with your right arm extended straight out. Pull back your fingers with the other hand until you feel a stretch in your forearm. Hold for 10 seconds and repeat with the other wrist. Now push down the fingers with your opposite hand until you feel a stretch on the top side of your forearm. Hold for 10 seconds and repeat with the opposite wrist.
Printable Version of Dynamic Stretches
| dynamic_golf_stretches.pdf |
Sample Workout
A 14-week exercise plan with programming 5 days per week. This is a great way to get started toward your golf fitness goals!
| workout_schedule.pdf |